These docs are for v2.0. Click to read the latest docs for v3.0.

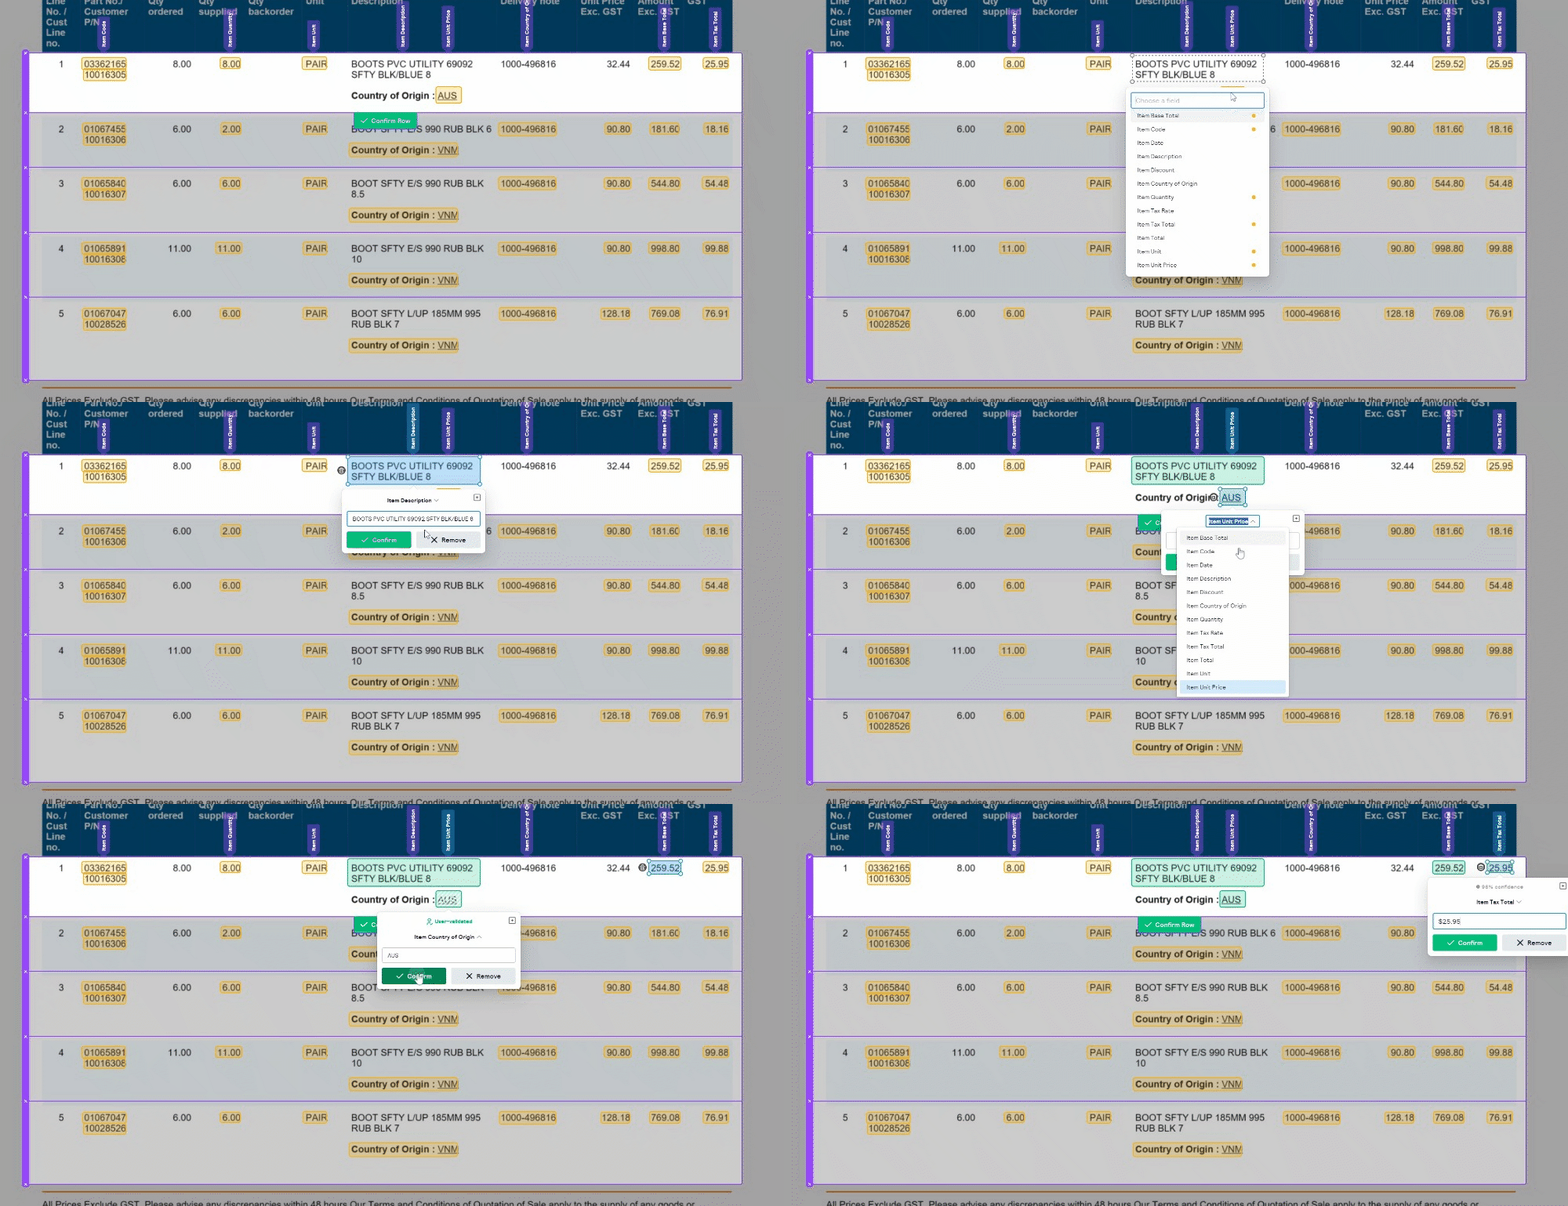
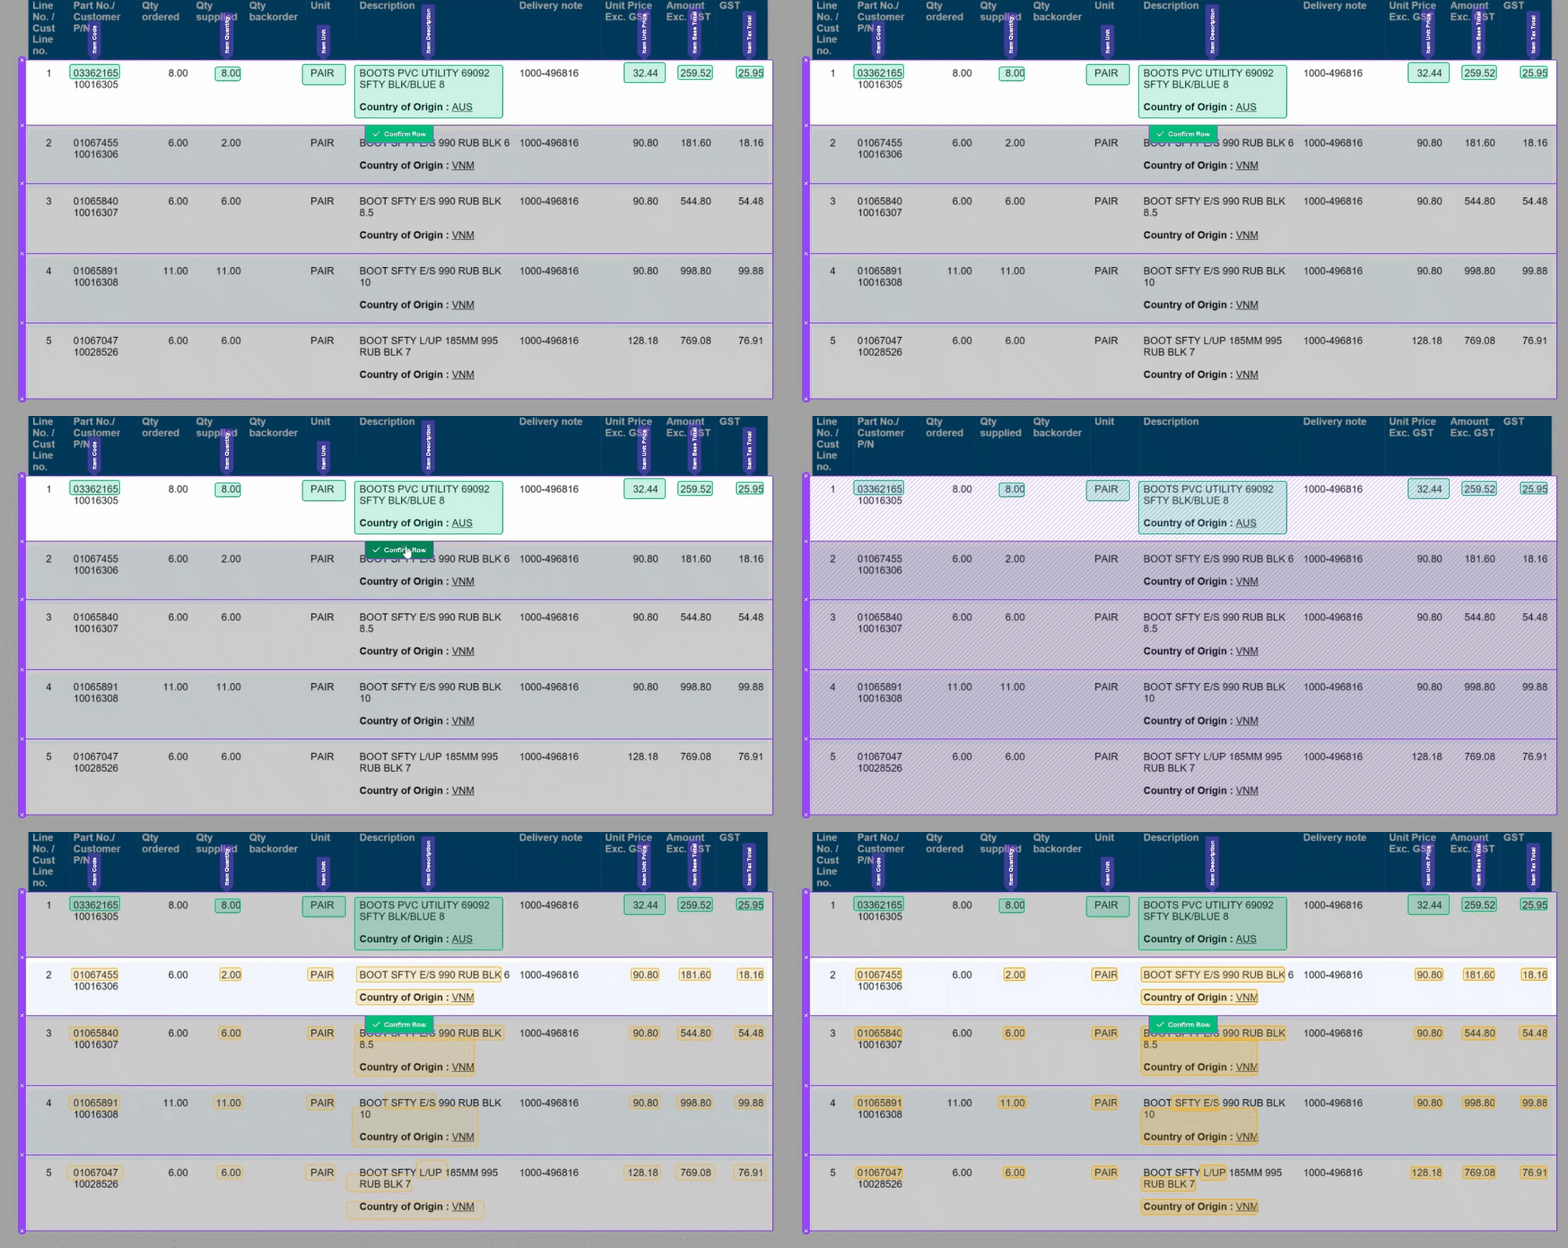
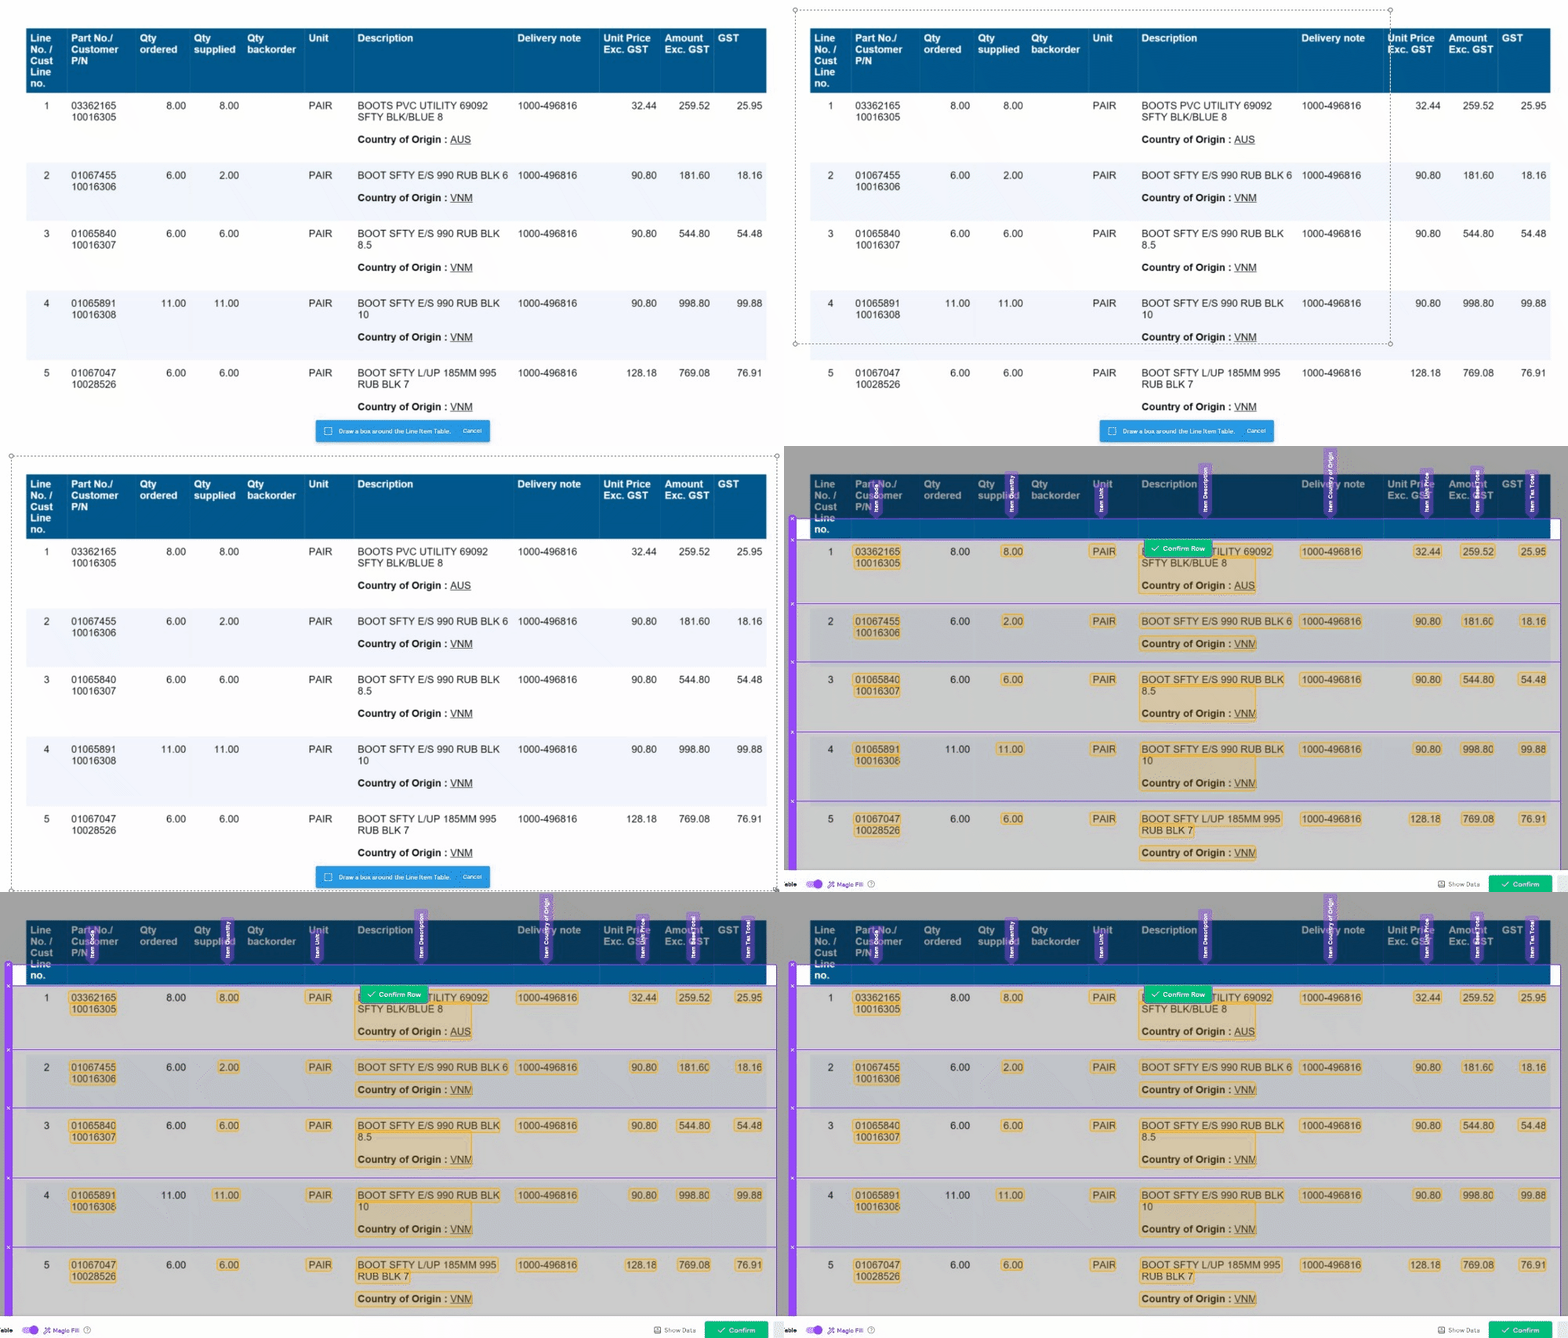
We've made some important improvements to our Magic Tables feature. These updates are all about making life easier. With these Magic Tables improvements, you can effortlessly capture nested or semi-structured data. It's a more stable and intuitive experience that empowers you to work with confidence.

๐Ÿ“˜

Magic tables in 'beta' mode

Magic Tables are still in beta mode for a full release as the standard option for invoice tables later this month. To enable these tables, update the field settings in your invoices Collection and enable 'Line Items (beta)' (disable the existing Line Items Field).

What's New in Magic Tables?

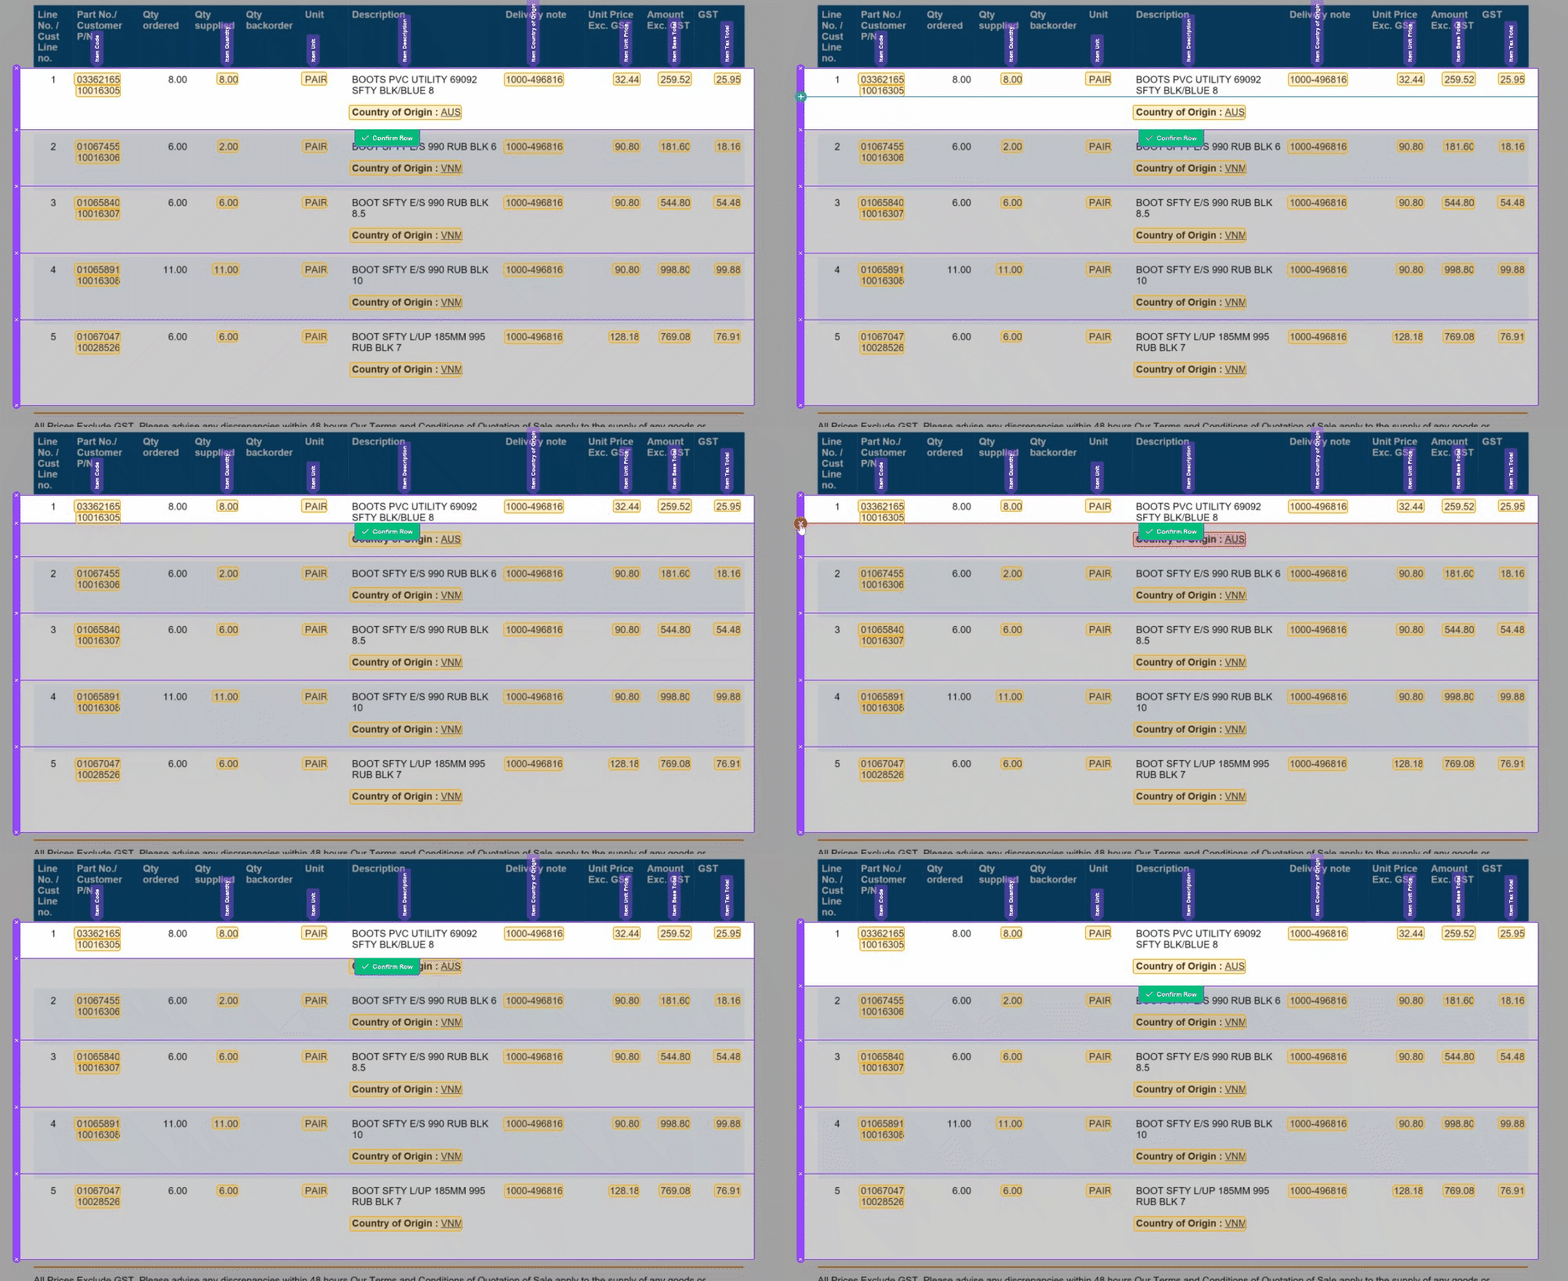
๐Ÿง™โ€โ™‚๏ธ 1. Enhanced Validation: We understand the importance of accuracy in your data. Now, with our improved Magic Tables, you'll be prompted to validate information row by row. This ensures that your data is accurate and error-free, providing you with more control and confidence in your work.

๐Ÿ”ฎ 2. Magic Fill Control: We've made a significant change to 'Magic Fill.' It will now only be applied to rows below your current selection. This adjustment increases the stability of your data and minimizes unintended changes, giving you a smoother user experience.

๐Ÿ”€ 3. Toggle 'Magic Fill': Your data, your control. We've added the ability to toggle 'Magic Fill' on and off, allowing you to decide when you want to harness the power of automation and when you prefer manual data entry. Flexibility at your fingertips!

๐Ÿ“Š 4. Improved Table Layout: We know how crucial screen space is when working with tables. That's why we've made the table output grid from the bottom hidden by default. This means more screen real estate for you to work with, making your tasks more comfortable and efficient.

๐Ÿ” 5. Consistent Field Editor: To create a seamless user experience, we've ensured that the Field Editor is now consistent with the rest of the UI. This makes navigating and editing your data fields a breeze.
We are delighted to announce the addition of some much-requested features to our app for tailored + custom models.

Learn from Reviewed Documents

We've introduced the "Learn from Reviewed Documents" toggle into our app. With this feature, users are given the power to decide if documents, confirmed in a certain Collection, should be included in the training queue for the relevant Extractor. So, now not only can you have QA/Dev & Live Collections with the same Extractor, you can also avoid model regression caused due to unwanted data being fed into the system. This means you now have greater control over which documents are used to train a model without having to rely on us making changes at the backend.

Date Last Trained

Secondly, we've also incorporated an indication of when a model was last trained. This imparts drastically improved visibility into the modelโ€™s performance capabilities. With this feature at your disposal, you can now better assess whether a model should have improved from a re-train.

Accessing the Features

To access these features is simple:

  1. Navigate to 'Collection settings' in the app.
  2. To enable the learning toggle, all you need to do is flip it on.

These features are available not only via the app interface but also through our API for enhanced convenience and flexibility

We've made it easier than ever for partners and resellers to gain insights into credit consumption at a more granular level. Now, you can access detailed credit usage data for specific Workspaces or Collections using our new API endpoints, enabling you to make informed decisions and streamline your billing processes.

Using the Credit Usage API Endpoints

We have released two new endpoints that both work in the same way. Simply specify the relevant Workspace or Collection that you would like usage data on, and the date range (in the form of YYYY-MM) and we will return the number of credits used by that Collection or Workspace in the period.

The relevant endpoint for credit usage by Workspace is here.

The relevant endpoint for credit usage by Collection is here.

๐Ÿšง

Credits tracked from 27th July 2023 onwards

Documents uploaded prior to this date will not be tracked at Collection or Workspace level, only at the Organization level

Benefits

๐Ÿ“ˆ Accurate Cost Allocation: Partners and resellers can now accurately allocate costs to their respective customers based on the actual credit usage in each Workspace or Collection. This level of precision ensures fairness in billing and builds trust with your clients.

๐Ÿ” Granular Insights: Dive into the nitty-gritty details of credit consumption, helping you identify trends, spikes, or any anomalies that might impact cost distribution. This transparency empowers you to optimize resource allocation and improve cost-efficiency for your customers.

๐Ÿ’ผ Streamlined Billing: Say goodbye to tedious estimations! Our Credit Usage Data feature enables you to automate and simplify the billing process by providing clear credit consumption metrics. This saves you time and eliminates manual errors in your billing workflow.

We are thrilled to announce the release of our latest feature - Automated Document Splitting! This powerful addition allows you to split a single PDF document into its individual components automatically, streamlining your document management process like never before. Say goodbye to manually identifying splits and hello to increased efficiency!

We understand that dealing with multiple invoices (or other document types) in a single PDF document can be a time-consuming task. With our new automatic document splitter, you can now seamlessly handle such situations. Whether you receive multiple invoices from suppliers in one document or scan multiple physical invoices together as a single PDF, our document splitter ensures that all data is correctly parsed, saving you valuable time and eliminating the risk of missing any important invoices.

Enabling automatic document splitting

Activating the Automatic Document Splitting feature is easy! Simply navigate to the Workspace settings within the app, and you'll find the option to enable it.

We understand that each customer may have unique requirements, which is why we provide the flexibility to configure how you would like the splitter to function, with 4 options available to customers:

  1. Leave - automated splitting is off, we don't split any documents or prompt the user that multiple documents may have been detected
  2. Conservative - we do not action any splitting of documents, but we present a warning to the user in the validation interface that multiple documents have been detected
  3. Recommended - documents that are highly likely to contain multiple are automatically split, and warnings are added to documents that we believe may have multiple
  4. Aggressive - split all documents that we detect may have multiple

To provide better visibility, all split documents (automatic or manual) will have a purple 'split' icon associated with them so that users can easily see which documents have been split. This will make it easier for you to track document status in the list view and validation UI.

While the document splitter does its magic automatically, users will still have the option to manually split or combine documents again through the 'Edit' pages functionality. This gives you full control over your documents, even after the initial split.

We are delighted to announce some fantastic new features and enhancements to our validation tool that will take your experience to the next level!

What's New?

We have revamped our validation tool, adding new actions and reorganizing the layout to create a more user-friendly and efficient environment. Here's what you can now do with our improved tool:

Rename a Document: You asked, and we listened! Now you have the ability to rename your documents directly within the validation tool.

Add Tags to a Document: Organizing and categorizing your documents is now a breeze. Our updated tool allows you to add relevant tags to your documents within the validation tool, making it easier to manage and search for specific files later on.

Export Document Data: We understand the importance of data accessibility. With this new functionality, you can now export document data directly from the validation tool, saving you valuable time and effort.

See Document Warnings: Stay informed and address potential issues proactively. Our latest update enables you to view document warnings, ensuring you are aware of any important concerns that may require your attention.

Manual Annotation: In the rare instance where document parsing fails, we've got you covered. You can now annotate documents manually, ensuring that no document is left unattended.

In addition, we've also made some minor tweaks to the overall appearance and layout of the validation tool.

Embedded Users

For those of you embedding the validation interface into your platform, we now offer the flexibility to enable or disable specific actions at an Organization level. To make adjustments to the actions available in the embedded version, simply get in touch with our dedicated support team at [email protected]. We'll be happy to assist you in customizing the tool according to your requirements.

We are excited to announce that customers now have the ability to add custom fields to our 'off the shelf' models. This feature empowers customers to capture and utilize any data that is specific to their unique use cases.

In addition, we have implemented a predictive data functionality that can automate the process of filling in these custom fields.

๐Ÿšง

Not available for Recruitment AI customers at this time

Custom field predictions are only suitable for Accounts Payable and Compliance document types currently

Adding Custom Fields:

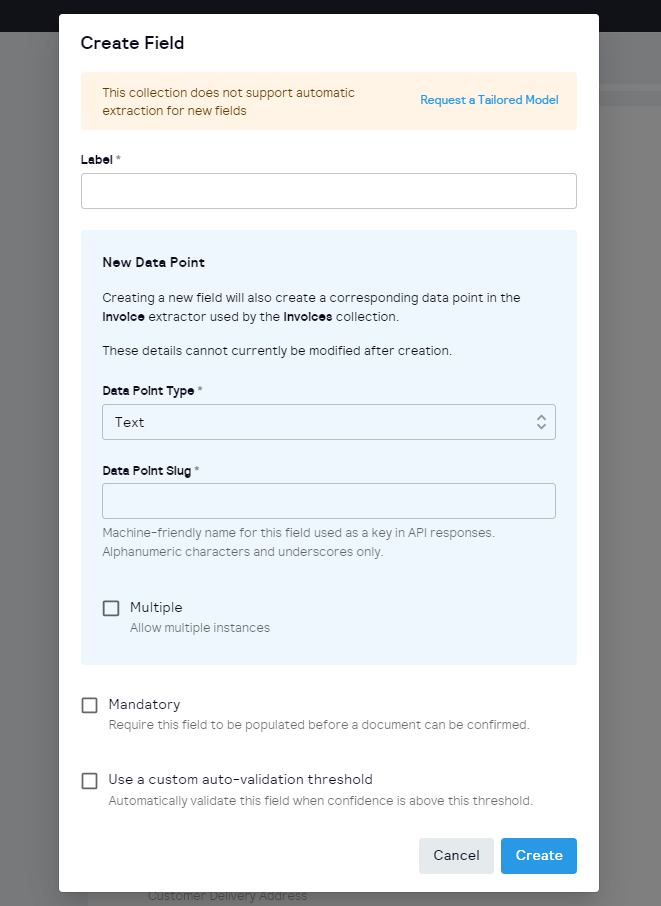
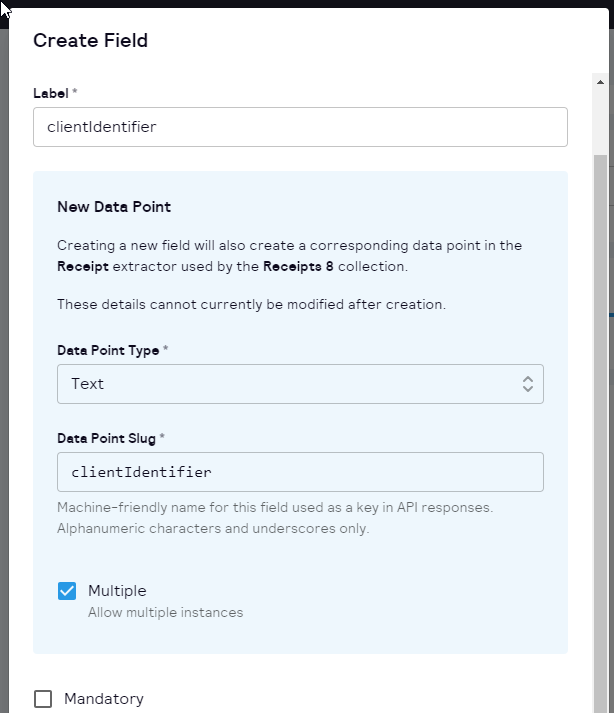
To add custom fields to your tailored invoices, edit your field configuration in your Collection Settings page or by clicking Edit within the Validation UI in the app. Click '+' to add a new field and then specify:

  • Label - this is what is shown in the Validation UI
  • Data Point Type - this influences any post-processing applied (e.g. data, number formatting)
  • Data Point Slug - auto-generated from the label, but can be edited
  • Multiple? - specify if there could be multiple examples of the data point in the document, or only once

Training the custom field

Enabling Predictive Data with OpenAI

If consent to use OpenAI is enabled for your account, you can leverage its capabilities to predict the values of custom fields based on existing examples. Here's how it works:

  1. Initial Validation: Validate one document with the desired custom field and manually label the data point.
  2. OpenAI Prediction: Once the initial validation is complete, OpenAI will analyze the labeled example and predict the custom field's value for new documents.
  3. Accumulating Examples: Continue validating additional documents with the custom field until you have a minimum of 10 examples.
  4. Model Predictions: Once you have enough examples, our own models will take over the prediction task, replacing OpenAI.

Using Manual Labeling (Without OpenAI)

If consent to use OpenAI is not enabled for your account, you can still benefit from custom fields by manually labeling the data points. Follow these steps:

  1. Manual Labeling: Validate each document individually and manually label the values for the custom fields.
  2. Accumulating Examples: Label the data points for each document until you have enough labeled examples for accurate predictions.

We understand that you might want to add new data fields to your Collection after you have already added and validated some documents for training. With our system, you can easily add new data fields at any point in the process. The model will only train that data point on documents added after the data point was created, meaning users won't need to go back through their backlog of documents to correct the data for the new field.

Affinda has integrated with OpenAI's GPT family of large language models to enable a seamless and immediate experience when creating new models and when adding new fields to existing models.

With our OpenAI connection, Affinda now offers "one-shot learning," meaning that you only need to provide one annotated example document to start making accurate predictions on subsequent documents.

This means you can begin utilizing the models almost instantly, and their performance will only improve over time. As we transition from OpenAI-generated predictions to Affinda's standard model framework, which delivers faster and more precise results when ample data is available, the quality of results will continue to excel.

When OpenAI is used

Affinda may leverage OpenAI's technology in the following scenarios:

  1. Creating a new custom extractor.
  2. Adding a new custom field to one of Affinda's standard extractors, such as invoices.

๐Ÿ“˜

No data is shared with OpenAI when using our 'off-the-shelf' models

We do not share any data with OpenAI for model training if you are using our standard models (e.g. resume, job description, passports, etc.), even if you have given consent

Respecting your consent

As Affinda utilizes OpenAI's technology, we value your consent to utilize this integration. Customers have the option to opt-out when creating new Collections or through the Collection Settings page at any time if they prefer Affinda not to send documents to OpenAI.

๐Ÿ‘

Opting out of using OpenAI does not restrict the creation of custom extractors or fields

However, it does require customers to manually label all data in the initial set of documents (approximately 50) before an Affinda model can be created without any predictions provided. This may increase the manual effort required

For more information on creating custom models or adding custom fields to a standard extractor, please get in touch.

Our latest API version, API v3, now supports the seamless adding and updating of resume and job description data, including custom fields. This improvement resolves compatibility issues experienced with API v2 and ensures a smoother experience for all users.

Key Features

1. Resume Data Updates: Modify resume data programmatically with API v3. When recruiters or candidates edit the information in your platform, this gets reflected in Affinda's system and flows through to our Search & Match product.

2. Job Description Updates: Update job description details, including qualifications and responsibilities, to enhance the Search experience.

3. Create from data - create resumes or job descriptions directly from your existing data, meaning you don't need to reparse documents

4. Custom Field Support: Add and update custom fields that suit your specific requirements.

5. Improved Compatibility: API v3 resolves previous compatibility issues, ensuring that users can stay using the latest API version at all times.

Get Started

Resumes or job descriptions can be created from 'data' using the Upload a document for parsing endpoint.

Updating of resume and job description data is available via the Update a document endpoint. (For other document types, please use Update an annotation or Batch update annotations.

Our latest update allows you to request a custom model tailored to your needs, right from within our app! Unlock a more personalized document processing experience that achieves greater accuracy and delivers even greater efficiency gains.

This feature is perfect for invoice extraction, but can also be applied to other document types where it makes sense. To request a tailored model, simply go to the Collection settings or field layout configuration interfaces.

Once you submit your request, our customer support team will configure a model that suits your requirements, ensuring accurate and efficient data extraction.

We have released a new and enhanced Field Configuration Interface within our app to deliver greater control and customization options for managing fields in our platform.

Key features of the new Field Configuration Interface include:

  • Reorder and Group Fields: Easily customize the arrangement of fields to suit your needs.
  • Edit Field Configuration within the Validation Interface: Streamline your workflow by editing field configurations directly within the validation interface.
  • Enhanced Collection Settings Page: Seamlessly manage and configure fields through the integrated Collection settings page.
  • Create Custom Fields: Tailor your fields by specifying the type, label, and whether multiple annotations are allowed within a document.

To explore the new Field Configuration Interface, simply log in to your account and navigate to the respective sections.