Document Workflow
While individual customer use cases will differ, the below workflow is a typical process that customers may use to implement the Affinda solution. The below design considers that users will be working within the Affinda web app. For information about how Affinda's solution can be 'embedded' within your own software solution, see Embedded Mode.
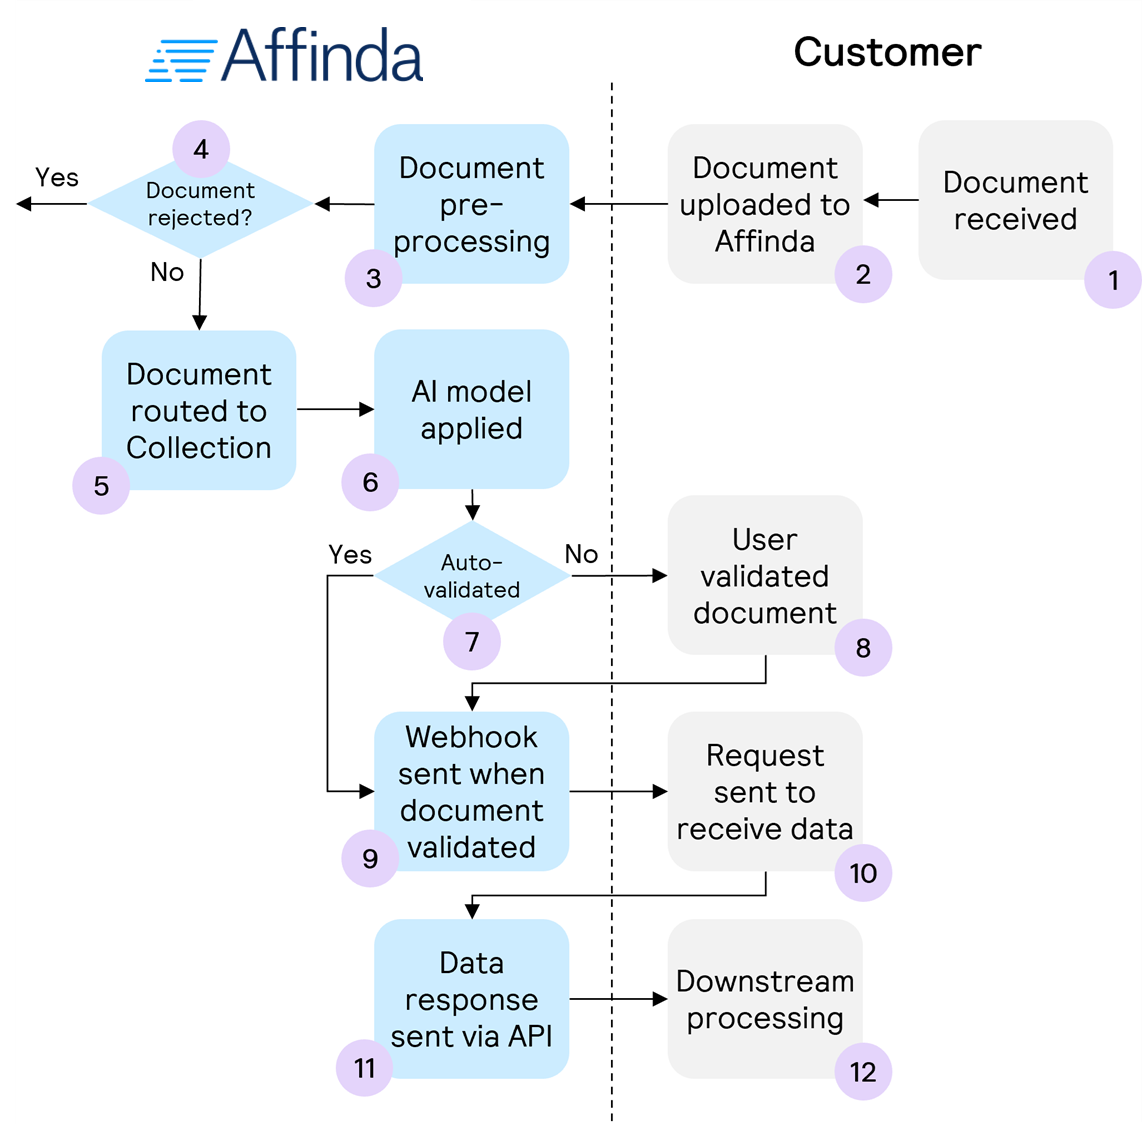
Note, the process detailed is simplified to show a 'happy path' for a document. A more detailed process may include additional steps to re-classify documents and review rejected documents, as well as additional steps for data validation.
Process Diagram
Process Steps
The following provides more detailed information on each of the steps shown in the above process diagram, as well as additional detail about the different implementation options available to customers.
1. Document received
For most customers, documents are received first before sending to Affinda. However, there is potential to skip this step and have the original source of the document (e.g. supplier) send directly to Affinda via email.
2. Document uploaded to Affinda
Documents can either be sent to a Workspace or direct to the Collection. Documents sent to a Workspace will be classified and routed to the correct Collection (if it exists) in pre-processing while documents sent directly to a Collection will only have a classification applied if the setting to reject invalid document types is enabled for that Collection.
Documents can be uploaded in various ways:
- App upload - simply drag and drop documents into the relevant Workspace or Collection
- Email upload - each Workspace and Collection has a unique email address (found on the Settings page) associated with it. All attachments to emails sent to these addresses will be extracted and processed by Affinda.
- API - documents can be uploaded using the Upload a document for parsing endpoint. Affinda will include a unique identifier for the document in the response. If wait is set as true, the response will be returned once parsing is complete with all of the data extracted by the AI models, however, if wait is set as false the response will be returned immediately without the full data response.
- Integrations - integrations can be set up that send documents seamlessly to Affinda. These integrations include Zapier, RPA solutions or other connections.
3. Document pre-processing
Affinda completes a range of pre-processing steps on the document to ensure accurate data. These steps can be enabled or disabled via Workspace settings. They include:
- Document deduplication
- Document splitting
- Document classification, routing and rejection
For more information, see Pre-Processing.
4. Document rejection
Account settings can be enabled to reject documents of the wrong type for the Workspace / Collection, or if it is a duplicate of a document already processed. Documents rejected will be sent to the 'Rejected' queue, where they can be returned to an appropriate collection for further processing upon human review.
5. Document routed to Collection
Where a document is uploaded to a specific Workspace, Affinda will classify the document and route it to the appropriate Collection.
6. AI Model applied
Affinda will apply the AI model (also known as Extractor) associated with the Collection to the document.
7. Auto-validation
Data points and the document itself can be validated automatically using a range of different rules. Documents that meet the requirements will be auto-validated or 'straight-through processed' and thus skip the human validation step. These documents will advance automatically to the 'Confirmed' stage within the app.
Auto-validation options include:
- Confidence Thresholds
- Business Rules
- Data Matching
8. User validates document
For documents not auto-validated, a user can review the document and the model predictions using our validation interface. The validation interface is an easy-to-use tool that enables users to quickly correct and confirm the data extracted by the model to ensure 100% accurate data for downstream processing.
For more information, see User Validation.
9. Webhook sent when the document is validated
Typically, customers will use a webhook when a document is both auto-validated or through the user interface. This saves constantly polling the API to check if the document has been validated yet. The webhook can be configured for various events including document.validate.completed.
For more information, see the guide for Webhooks or view Webhook within the API reference.
10. Request sent to receive data
The webhook will include the meta data object for the document, but not the full response. To receive the full response, customers should use the unique identifier associated with the relevant document and the Get specific document endpoint.
11. Data response sent via API
Affinda will return the full data response. This data will be updated according to any of the validations that have occurred earlier in the process.
12. Downstream processing
The document and associated data can now be processed further in the downstream application (e.g. accounting platform, ERP, etc.)
Updated 8 days ago